← Docket · Setup, per source · FAQ · Security
How to work in Docket
Docket puts the work waiting on you in one place, on your Mac. This guide goes task by task. Each part is short and ends with a pointer to the next. For connecting one tool at a time, the setup page goes source by source.
- Get started in five minutes
- See what needs you
- Answer without leaving Docket
- Open an epic
- Plan your day
- Capture a meeting
- Dictate, and say it then approve it
- Keep your data private
- See when you were at the Mac
- When a source looks empty
- Keyboard shortcuts
- Drive Docket from a launcher
- Keep your frame in the menu bar
- Every page, in one line
Get started in five minutes
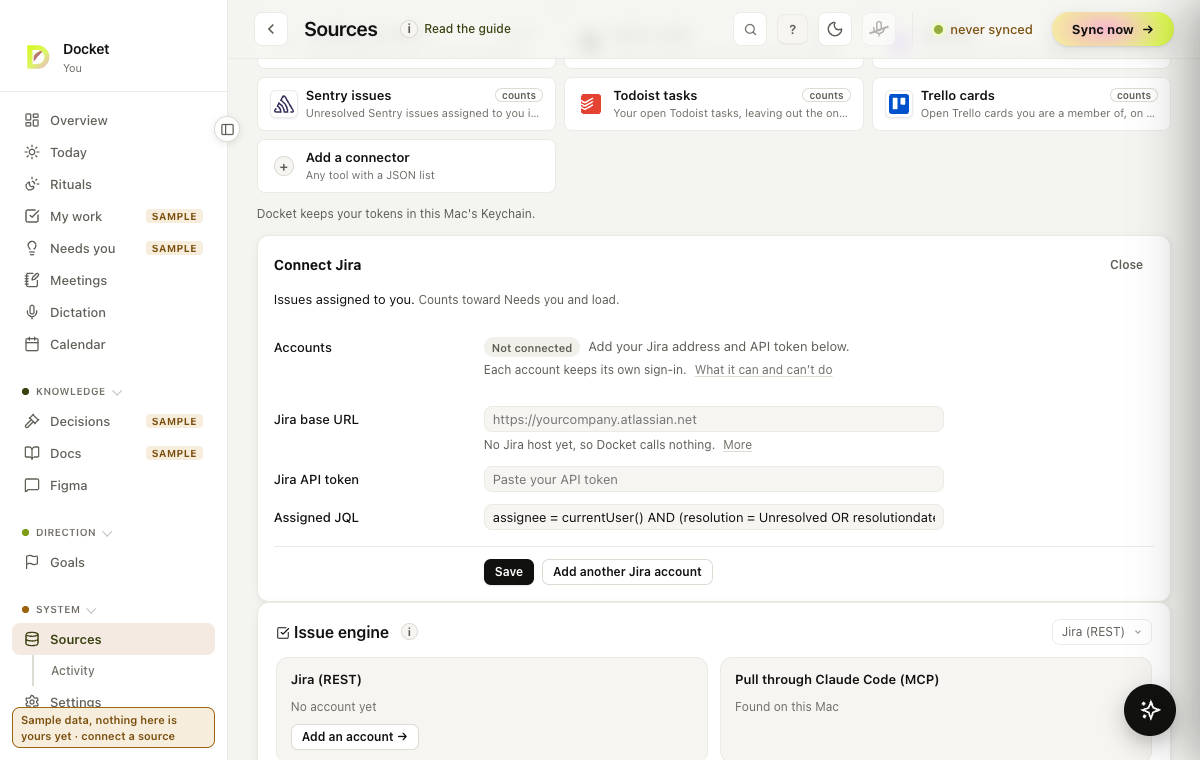
SourcesEvery connector’s state and freshness, plus the two engines Docket runs on: your issue tracker and your AI.
One connected source turns the sample data into your own list. There is no Docket account to make.
- Open Docket. The first run shows sample data, and the rail says so: Sample data, nothing here is yours yet.
- Open Sources, under System in the rail. Pick your tool under Not connected and press Connect →.
- Paste a token you made in that tool, then press Save. Docket keeps it in this Mac’s Keychain.
- Press Sync now, top right. Once your own work arrives, the sample data is gone.
After that, Docket syncs every 15 minutes. You can change that under Settings, Automation, Auto-sync interval. Want a tour? In Today’s ⓘ, press Show me around again.
Next: see what needs you.
See what needs you
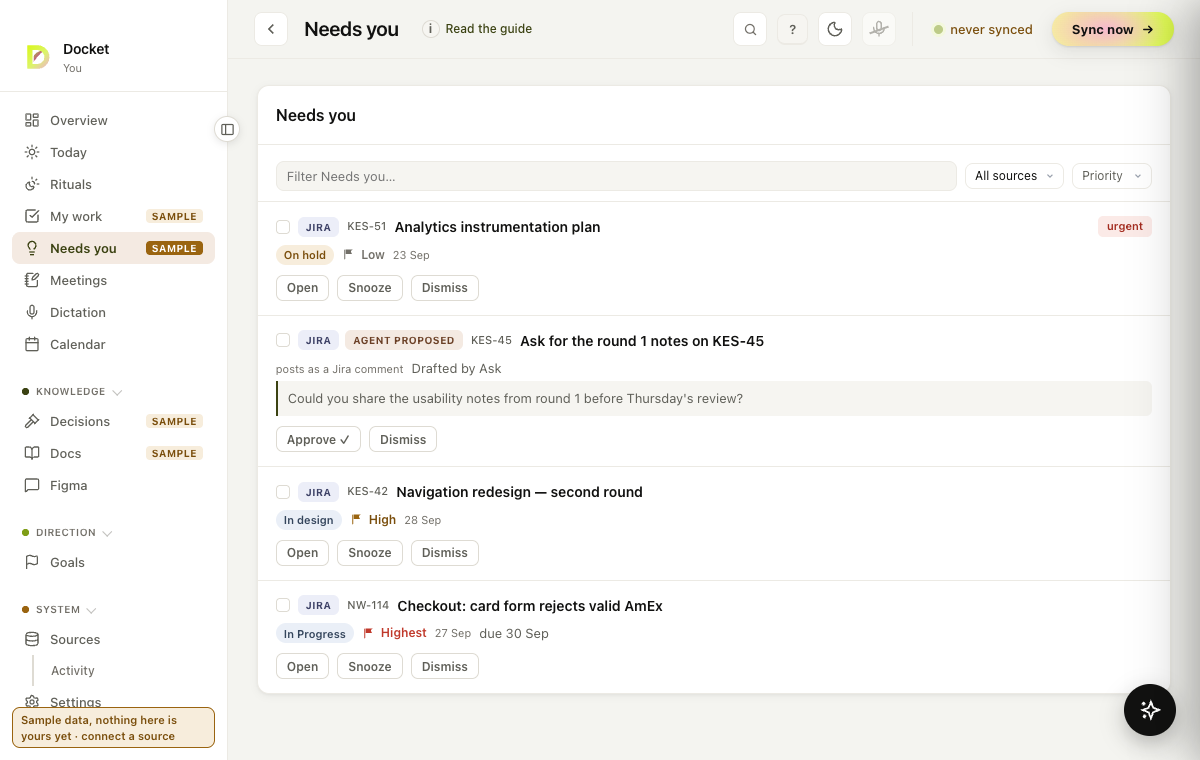
Needs youA cross-source inbox of everything awaiting you (Jira, Obsidian tasks, Figma @mentions, approvals) to clear or snooze.
Every tool keeps its own inbox. Needs you is one list across all of them, so nothing waits unseen.
- Open Needs you in the rail. Today shows its top five, with a link to the rest.
- Read a card from left to right: the source tag, the key and title, then status, priority and date.
- Blocked and urgent work sits at the top. An urgent card says urgent in words.
- Snooze hides a card until tomorrow. Dismiss hides it here and leaves the source untouched.
- A proposal shows its draft, with Approve ✓ and Dismiss. Nothing in it is written until you approve it.
A ticket from a library connector counts here too. A feed of your own is shown, never counted.
Answer without leaving Docket
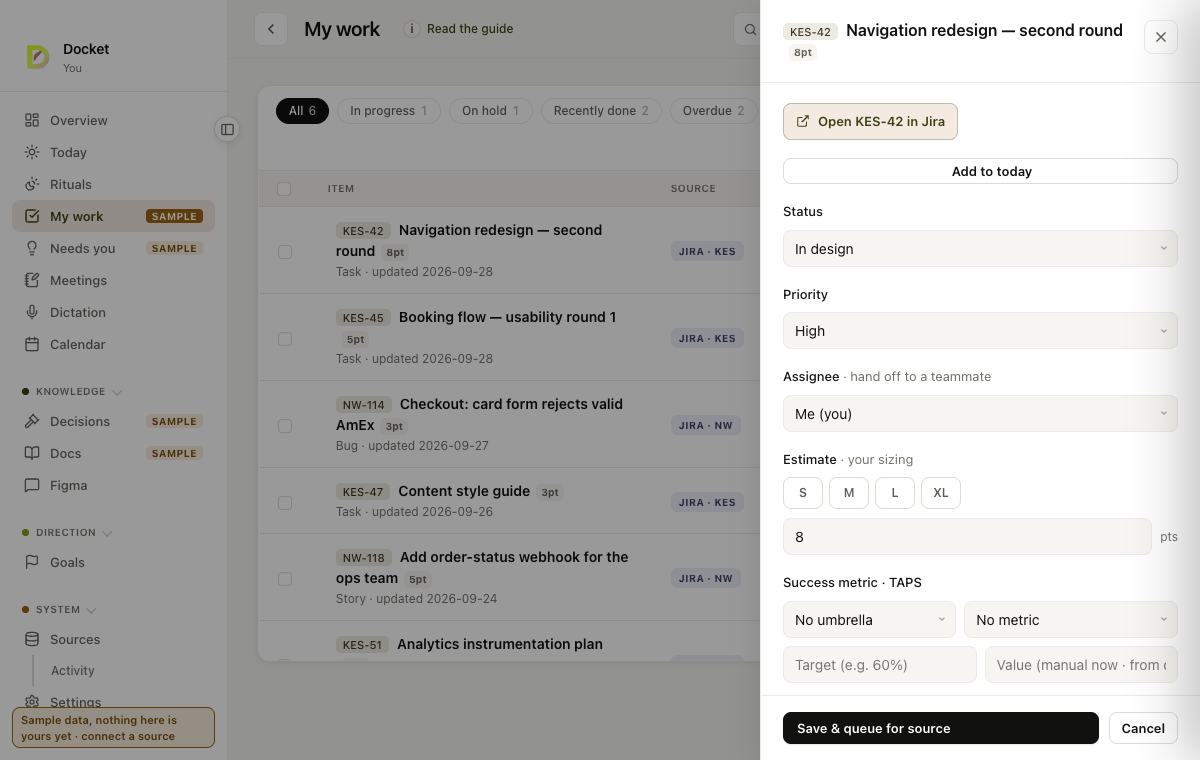
My workYour active tickets from Jira, Linear and library connectors, to filter, edit status, comment and plan.
Opening five tabs to answer one question is the cost Docket removes. You answer here, and it goes back to the source.
- Comment. In My work, press the comment button on a row, type, and press Post.
- Status. Click the status on a row. For Jira, the menu offers the moves the workflow allows.
- Estimate, priority and assignee. Click a row’s title to open it, change the field, and save.
- Figma. On the Figma page, press Reply on a comment, then Post reply.
Nothing goes back to a source until you press the button that sends it. Writes are listed under Activity, in Write-back queue & audit. A Linear estimate follows your team’s own scale. With two Jira accounts, an answer goes to the account its row came from.
Docket’s own suggestions, from Ask or your voice, wait in Needs you until you approve them. Settings, Automation, Assistant actions starts on Propose, and let me approve each one.
Next: open an epic.
Open an epic
EpicOne epic in one account: its tickets down to sub-tasks, and the Figma and Confluence activity that names them.
A ticket under an epic shows that epic in its drawer. We keep the whole body of work one click away.
- Open a ticket and click its Epic line. An epic row in My work has Open epic. Search finds epics by name too.
- Tickets lists the epic and every ticket under it that you hold, down to sub-tasks.
- Activity lists the Figma comments and Confluence pages that link to or name those tickets, by day.
- Press Show everyone's to add your colleagues' tickets in that epic.
Show everyone's reads that epic from the Jira you connected, once, when you press it. It writes nothing.
With two Jira accounts, each epic stays in its own account. Two epics with the same key never merge.
Next: plan your day.
Plan your day
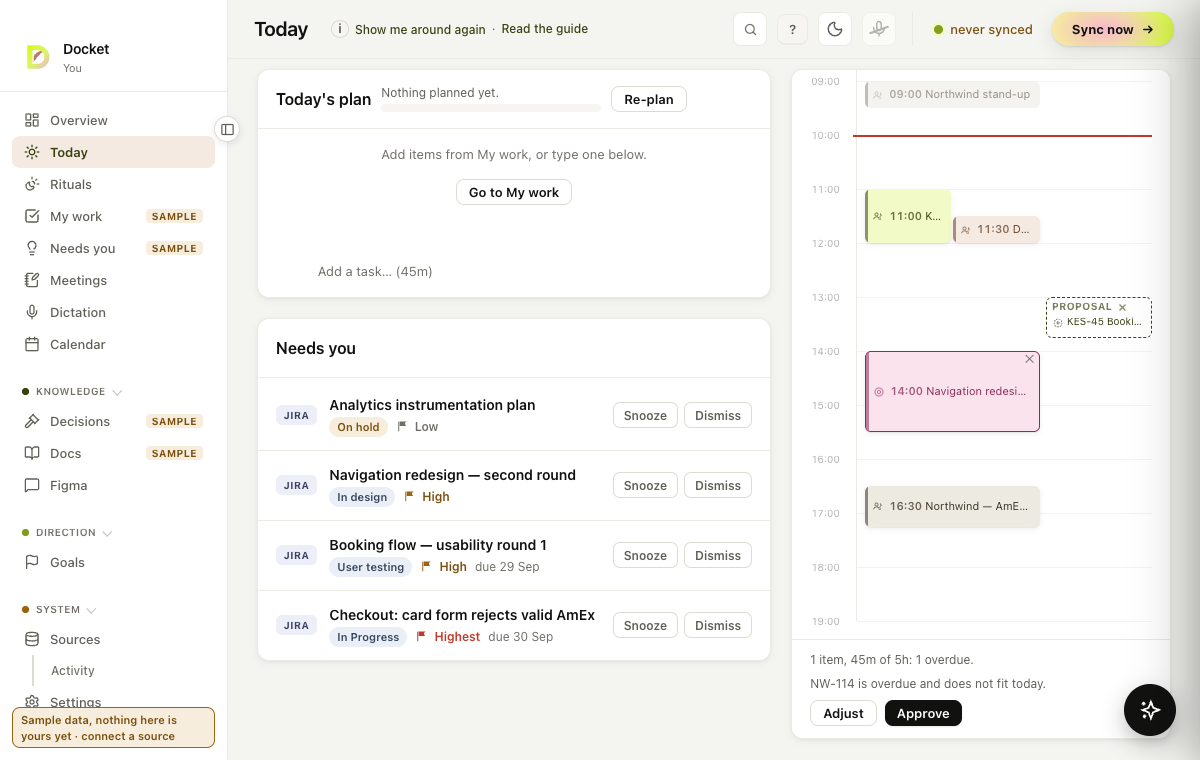
TodayYour day: plan today's work, check capacity, and clear the top items that need you.
A list does not tell you what fits in a day. The Day canvas puts your work beside your meetings.
- Connect your calendar first. The Day canvas and Plan my day show once a calendar is read.
- Press Plan my day in Today’s plan. With nothing left to place, it picks up to six items.
- It takes overdue work first, then what waits on your decision, then what is in progress.
- The blocks appear dashed on the Day canvas. Nothing is written until you approve.
- Press Adjust to drag them to new times, then Approve. The blocks go to your calendar.
To add one item yourself, press Add to today on a row in My work. Or drag a row’s grip onto the Day canvas. The bar in Today’s plan shows how full the day is. Without a calendar it uses Settings, Automation, Working day.
Next: capture a meeting.
Capture a meeting
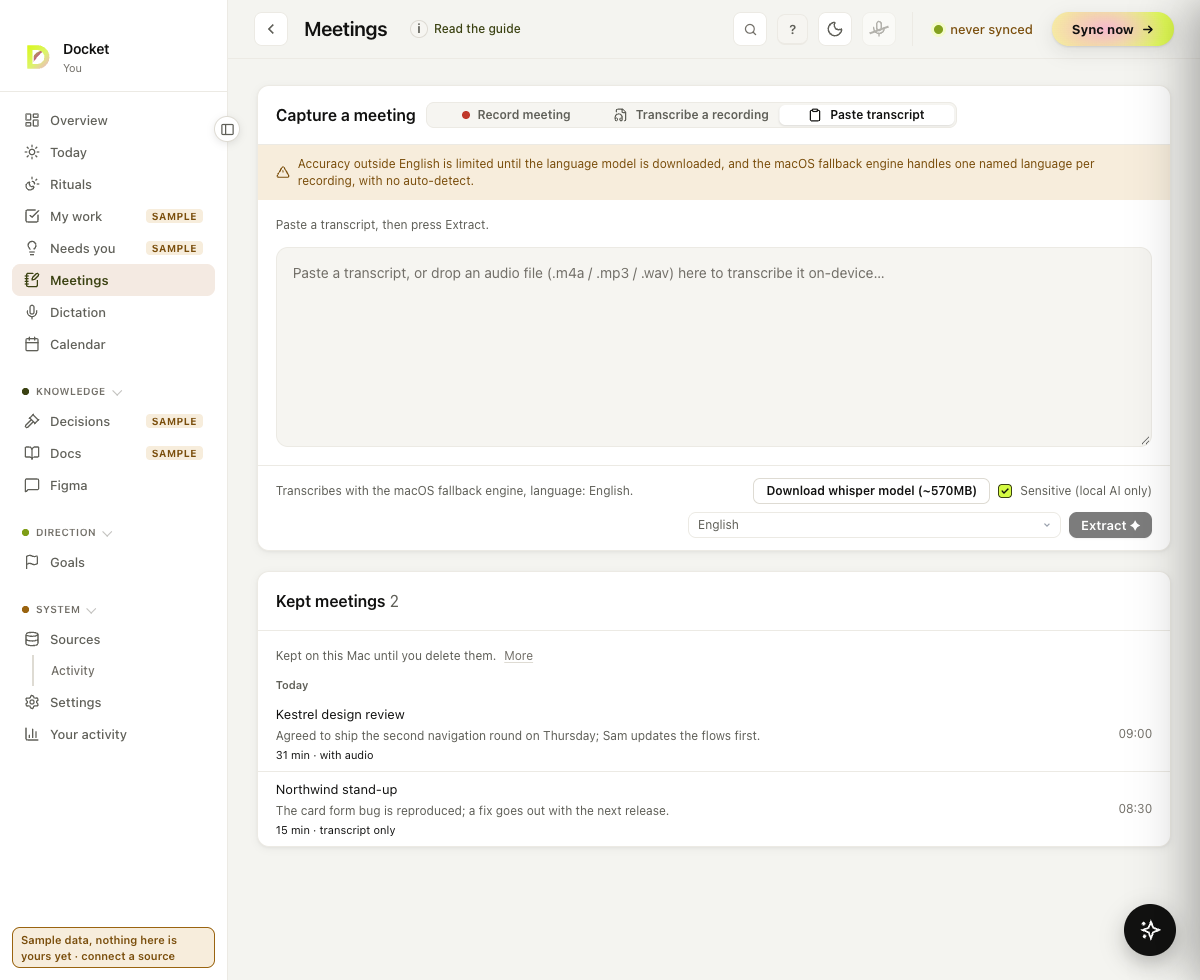
MeetingsRecord a meeting (or import audio), transcribe it on this Mac, and turn it into notes, decisions and follow-ups.
What was agreed in a call should not live only in your memory.
- Open Meetings and choose how: Record meeting, Transcribe a recording or Paste transcript.
- Recording takes your mic and the call. The first time, Docket asks you to tell the others you are recording.
- Transcribe a recording takes an .m4a, .mp3 or .wav file. Transcription runs on this Mac.
- Press Extract ✦. On Review & route, edit anything: nothing is created until you save.
- Pick where each action item goes, then press Save & route.
Each meeting is kept under Kept meetings, on this Mac, until you delete it. Click a name to rename it. With an AI engine on this Mac, a one-line summary is written under it. Search with ⌘ K finds the name and the summary. Extract needs an AI engine; the next parts say which.
Recipes, beside Extract, run a saved prompt on a loaded kept meeting and keep the result with it.
Dictate, and say it then approve it
DictationEverything you dictated with the hold-to-talk key, newest first and copyable.
Typing is slower than talking. Dictation works in any app, and your voice can also start a reply.
- Hold right ⌥, speak, release. The words are pasted where your cursor is.
- Tap ⇧ while you hold to switch language: NL, EN or auto.
- macOS asks for Microphone, Input Monitoring and Accessibility. Without Accessibility, the text waits on your clipboard.
- To turn your voice into proposals: on the Dictation page, open the ⋯ menu and choose Turn on voice proposals.
- Then start a hold with one of three openers:
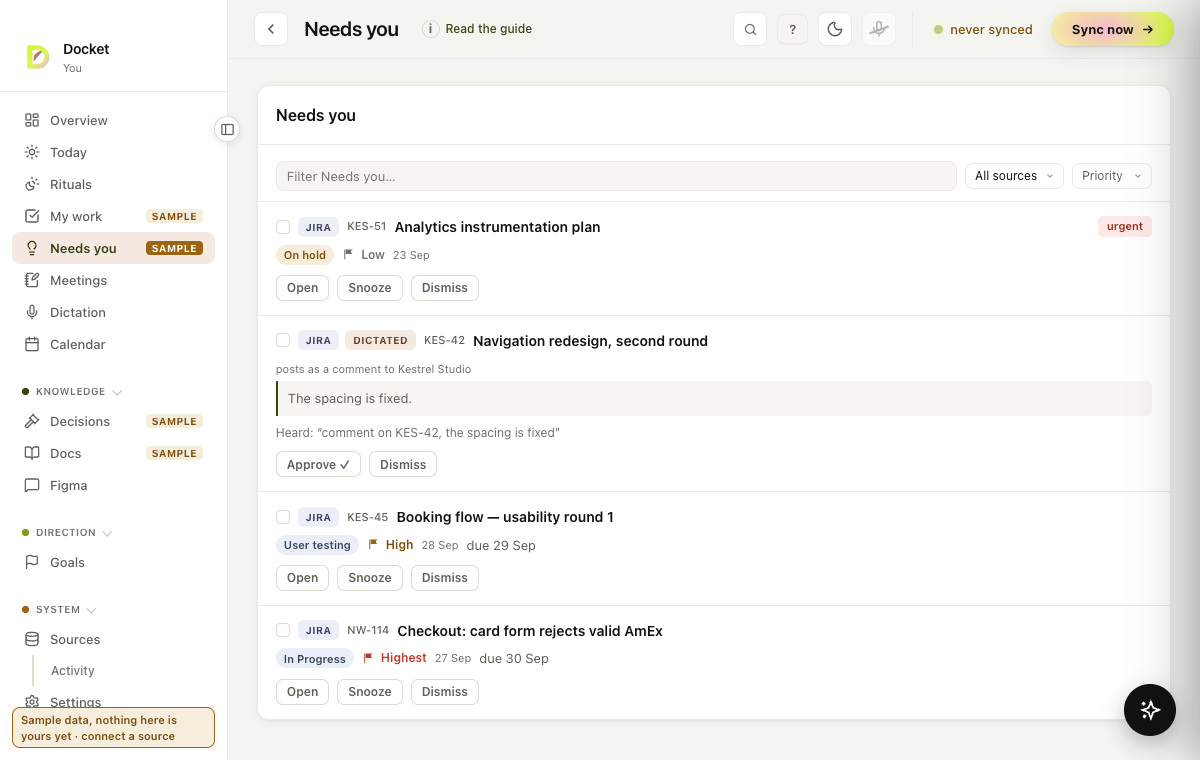
- “comment on KES-42, the spacing is fixed”
- “new ticket in KES titled fix the footer spacing”
- “block time for the design review tomorrow at 10”
A card tagged Dictated lands in Needs you. It shows what was heard and which account it goes to. Nothing is pasted or written until you press Approve ✓. This works without an AI engine. The switch starts off, and with it off, dictation pastes as before. Transcription runs on this Mac.
Next: keep your data private.
Keep your data private
Your work goes from your Mac to your own tools and back. No server of ours holds your work.
- Your tokens are kept in this Mac’s Keychain. Your data stays in a folder on this Mac.
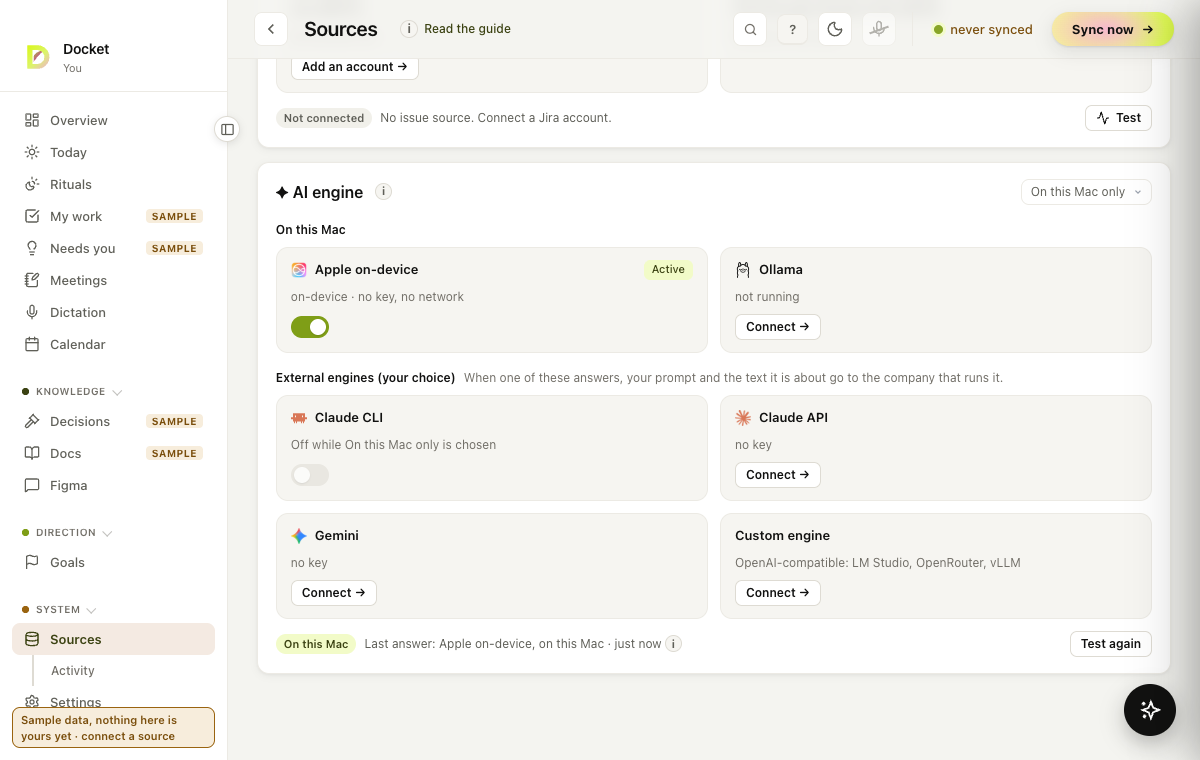
- Choose where AI runs with the select on the AI engine card in Sources.
- By default the AI runs on this Mac only. On this Mac only uses Apple’s on-device model or Ollama, and new installs start there. An engine is on this Mac only at a loopback address: localhost, ::1 or one starting with 127. Any other address, a .local name included, is an external engine.
- External engines are your choice, such as the Claude CLI or an API key. You turn them on yourself with This Mac first or Any engine.
- In Meetings, Sensitive (local AI only) starts ticked. It keeps that meeting on engines on this Mac.
Docket itself contacts a few hosts. It reads the update feed on docketmac.com once after launch, and sends nothing. The licence check runs at most once a day. It sends your licence key, the product id, and whether to count this Mac. Only the first check for a key on this Mac counts it. A daily check never uses a seat. The security page names every host, so you can check it yourself.
Next: see when you were at the Mac.
See when you were at the Mac
Docket can note when you were at your Mac, so the Day closure reports what happened.
- It is off until you turn it on. Open Settings, then Your data, and switch on At the Mac.
- Docket notes start and end times only. Away means locked, asleep, or 5 minutes with no input.
- It never notes apps, windows, web addresses, keys or the screen.
- The Day closure then adds one line about it. For example: “You were at the Mac 08:40 to 17:04, 6h 42m in all.”
- Switch it off at any time. Delete all beside the switch removes every noted time.
The times stay in presence.json in the data folder for 30 days. Docket never sends them anywhere.
Next: when a source looks empty.
When a source looks empty
A quiet source and a broken source can look the same. Docket tells you which one it is.
- “This filter has returned work before” means your Jira list is truly empty.
- “This filter has never returned anything” usually means the filter, not the work. Check the filter → opens it.
- A source that is down says what failed on its own card, such as credential refused (401).
- For more, open Activity and press Copy diagnostics. Names and hosts in it are replaced with stand-ins.
The setup page says what each source needs, if a token turns out to be wrong.
Next: keyboard shortcuts.
Keyboard shortcuts
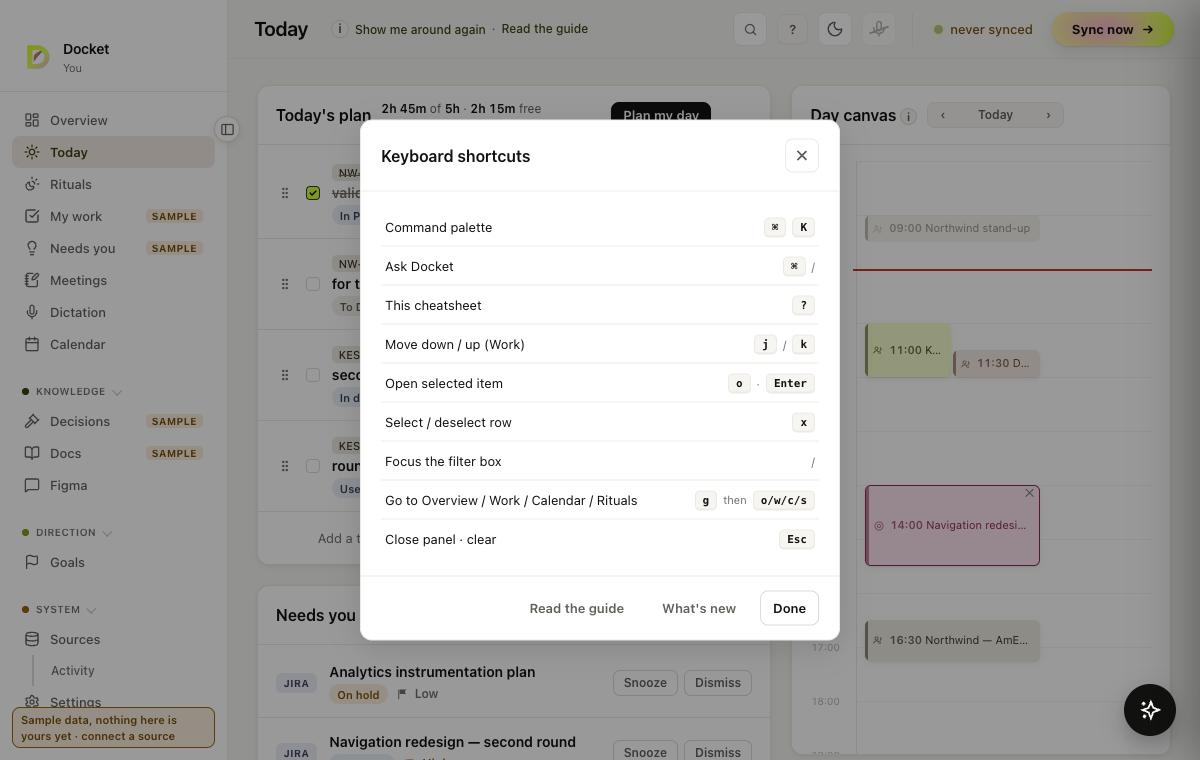
Press ? in Docket to see these at any time.
| ⌘ K | Search everything, and the command palette |
| ⌘ / | Ask Docket |
| ? | The shortcuts sheet, with the guide and What’s new |
| j / k | Move down or up in My work |
| o or Enter | Open the selected item |
| x | Select or deselect a row |
| / | Focus the filter box |
| g then o w c s | Go to Overview, My work, Calendar or Rituals |
| g then f i u | Go to Figma, Needs you or Your activity |
| Esc | Close a panel, or clear |
| Hold right ⌥ | Dictate, in any app |
Next: drive Docket from a launcher.
Drive Docket from a launcher
Capture a task or start a frame without switching to Docket.
- Open Settings, then This Mac, and press Copy the install line.
- Paste it in Terminal once. Docket never writes to
/usr/local/binitself. docket capture "Call the venue · 45m"leaves a card in Needs you.- On that card, Add to today's plan keeps it as a plan row. New ticket opens the form filled in.
docket frame start "Deep work"makes that frame the current one. Its chip on Today clears it.docket open todaybrings Docket forward.docket ask "what is overdue?"prints the answer.
In Raycast, Alfred or Shortcuts, run the command as a shell script. It never asks you to confirm.
A docket://capture?text=… link works too. A link asks you every time, because any web page can open one.
Nothing from outside posts anywhere. The security page says exactly what each way in can do.
Every page, in one line
Each page in Docket explains itself in its ⓘ, next to the page title. These are the same lines.
- Rituals The two fixed moments of your day, side by side: the morning Standup and the evening Day closure.
- Overview A calm zoom-out: portfolio counts, the week's capacity and recent activity, to glance at, not act on.
- Calendar A month grid of dated work, with your meetings once this Mac's own calendars are connected.
- Docs A library of Confluence pages that mention you.
- Decisions A running log of the decisions captured from meetings, with date, rationale, owner and source.
- Figma Your unresolved Figma comments across watched files, with the handled ones on their own tab.
- Goals The area outcomes your work ladders up to.
- Your activity Your honest metrics: cycle time, throughput, oldest WIP, time in Docket.
- Activity Activity: what Docket itself has been doing, and what needs a hand.
- Settings Your preferences, AI engine keys, automation, licence and data.
Back to the start of the guide, or on to the setup page.